Showing posts with label developing. Show all posts

Wednesday, May 27, 2015

Windows mobile apps හදමු - Part 5 ( Layouts )

Grid layout


මේ ලිපියෙන් කතා කරමු XAML Layouts ගැන.layout එක කියන්නේ interface එකේ components පිහිටන ආකෘතිය..මේ ලිපියෙන් කතා කෙරෙන්නේ grid layout එක ගැන

අලුත් app එකක් open කරගන්න.සාමාන්යෙන් interface එකක් layout එක විදියට default තියෙන්නෙත් grid layout එකක්.ඒ කියන්නේ කොටු දැලක විදියේ ආකෘතියක්.mainpage.xaml එක open කලාම ඉහලින්ම import ටිකත් ඊට පහලින් grid layout ටැග් දෙකත් දකින්න ලැබේවි.ටැග් දෙක ඇතුලට පහල තියෙන code එක දාගන්න

<Grid.RowDefinitions>
            <RowDefinition Height="Auto"/>
            <RowDefinition Height="*"/>
        </Grid.RowDefinitions>
        <Rectangle Height="200" Fill="Red" Grid.Row="0"/>
        <Rectangle Grid.Row="1" Fill="Green"/>


මෙතැනදී මුලින්ම grid එකේ row එකක් කොහොම වෙන්න ඕනෙද කියල කියල තියෙනවා
<Grid.RowDefinitions>
            <RowDefinition Height="Auto"/>
            <RowDefinition Height="*"/>
        </Grid.RowDefinitions>


ඊට පස්සේ හැදෙන්න ඕනේ row දෙකක rectangle දෙකක් define කරලා තියෙනවා..

<Rectangle Height="200" Fill="Red" Grid.Row="0"/>
        <Rectangle Grid.Row="1" Fill="Green"/>


පලවෙනි rectangle එකේ row එක 0 විදියටත්,දෙවැනි row එක 1 විදයටත් define කරලා තියෙනවා

පලවෙනි rectangle එකේ උස 200ක් විදියටත් ,colour එක red විදියටත් දීල තියෙනවා

දෙවැනි rectangle එකට  උසක් දීල නැහැ ,colour එක green විදියට දීල තියෙනවා.මෙතැනදී මුලින් 200ක් උස rectangle එක හැදුනට පස්සේ තියෙන සම්පුර්න උසම අරගෙන තියෙනවා දෙවනි rectangle එකට.එහෙම වුනේ මේ grid layout එකට define කරලා තියෙන්නේ row දෙකයි.ඒ නිසා සම්පුර්ණ grid එක row දෙකකට බෙදිලා තියෙනවා..

දැන් <Rectangle Height="200" Grid.Row="1" Fill="Green"/> විදියට වෙනස් කරලා දෙවැනි  rectangle එකට 200ක උසක් දෙන්න...


මෙතැනිදී දෙවැනි rectangle එක 200ක උසට හැදිලා row එකේ මැදට align වෙලා තියෙනවා...අපි define කරන row ගානට අනුව layout එක හැදෙනවා.මේ දෙවැනි rectangle එක අපිට ඕනේ විදියට align කරගන්න පුළුවන්.

<Rectangle Height="200" Grid.Row="1" Fill="Green" VerticalAlignment="Top"/>

<Rectangle Height="200" Grid.Row="1" Fill="Green" VerticalAlignment="Bottom"/>

ඊලග ලිපියෙන් grid layout එක ගැන තව දුරටත් කතා කරමු...

Tuesday, May 26, 2015

Windows mobile apps හදමු - Part 4


කලින් ලිපියෙන් කතා කලේ interface එකට අදාළ XAML file එක ගැනනේ.අද cs file එක එහෙම නැත්තන් code එකට අදාල file එක ගැන කතා කරමු.
මේ තියෙන්නේ C# class එකක්.මේකේ ඉහලම තියෙන්නේ class එකට import කරගත්තු sources.

using System;
using System.Collections.Generic;
using System.IO;
using System.Linq;
using System.Runtime.InteropServices.WindowsRuntime;
using Windows.Foundation;
using Windows.Foundation.Collections;
using Windows.UI.Xaml;
using Windows.UI.Xaml.Controls;
using Windows.UI.Xaml.Controls.Primitives;
using Windows.UI.Xaml.Data;
using Windows.UI.Xaml.Input;
using Windows.UI.Xaml.Media;
using Windows.UI.Xaml.Navigation;

ඊට පහලින් namespace project_1 කියල තියෙන්නේ package එක.ඊට පහලින් class එක තියෙනවා..class එක ඇතුලේ තමා අනිත් සේරම දේවල් තියෙන්නේ.class එක තියෙන package එක සහ class එකට අවශ්‍ය imports තමා අර උඩින් තියෙන්නේ

class එක ඇතුලේ
public MainPage()
        {
            this.InitializeComponent();

            this.NavigationCacheMode = NavigationCacheMode.Required;
        }

මේ තියෙන්නේ instructor එක.ඒ කියන්නේ මේ class එක රුන් වෙද්දීම් වෙන්න ඕනේ දේවල් ලියන්නේ මේක ඇතුලේ.මෙහෙම කියමුකෝ.මේ app එක open වෙද්දී අපිට textblock එකේ hello කියල වැටෙන්න හදාගන්න ඕනේ නම් අදාළ code එක ලියන්න ඕනේ මේකේ
public MainPage()
        {
            this.InitializeComponent();

            this.NavigationCacheMode = NavigationCacheMode.Required;
                      tb1.Text = "Hello";
        }

ඊට පහලින් තමා component වලට අදාළ code තියෙන්නේ
private void but1_Click(object sender, RoutedEventArgs e)
        {
            String a=Text1.Text;
            tb1.Text = a;

        }


මේ code ඒකේ ලියල තියෙන්නේ button එක click කරද්දී මොකද්ද වෙන්න ඕනේ කියලා.මේ ටික තමයි විශේෂයෙන් කියන්න තියෙන්නේ.ඊළග ලිපියෙන් බලමු app එකේ layout හදාගන්න විදිය ගැන....

Wednesday, May 20, 2015

Windows mobile apps හදමු - Part 3


මේ ලිපියෙන් අපි component  ගැන ටිකක් කතා කරමු.app එකේ interface design එක හදාගන්න විදිය මම කියල දුන්නනේ.Solution explorer එකේ MainPage.xaml file එකේනේ interface design එක තියෙන්නේ.ඒක double click කරලා open කරලා ගත්තම design preview එකයි code එකයි දෙකම පෙන්නවා.වම් පැත්තේ තියෙන toolbox එකේ තමා components තියෙන්නේ.ඒවා select කරලා interface එකේ අදාළ තැන ඕනේ size එකට ඇඳ ගන්න ඕනේ


දැන් properties window එකෙන්(දකුණු කෙලවරේ පහල) ඒ component එකට අදාල properties වෙනස් කරගන්න පුළුවන්.


අංක 1 - name - මෙතන වැදගත්ම propertie එකක් තමා name එක.මෙතන දෙන name එකෙන් තමා code එකේදී component ඒක හදුනා ගන්නේ.දැන් බලමු interface එකයි code එකයි එකට අරගෙන


මෙතන <page> කියන ටැග් එකෙන් තමා මේ page එක පටන් අරන් තියෙන්නේ.</page> ටැග් එකෙන් තමා page එක ඉවර වෙන්නේ.මේ දෙක අතර තමයි අනිත් සේරම ලියන්න ඕනේ.HTML , XML දන්නා අයට නම් ටැග් කියන්නේ අමුතු දෙයක් නෙවේනේ.XAML කියන්නෙත් XMLම තමයි.Mark up language එකක්.

<Grid> </Grid>ටැග් වලින් කියල තියෙන්නේ screen එකේ layout එක කොහොම වෙන්න ඕනෙද කියල.මේකෙදි පාවිච්චි කරලා තියෙන්නේ Grid layout එකක්.ඒ දෙකට ඉහලින් තියෙන code වලින් කරලා තියෙන්නේ මේ file එකට අවශ්‍ය sources import කරගන්න එක.

layout එක ඇතුලෙ තමා අනිත් සේරම component තියෙන්නේ.අපිට ඕනේ නම් design එකේදී අදින්නේ නැතුව code එකේදී අතින් ලියල උනත් component දාගන්න පුළුවන්.

<Button x:Name="but1"
                HorizontalAlignment="Center" 
                 Height="60" Margin="0,400,0,0" 
                 Content="OK"
                 VerticalAlignment="Top" Width="100" 
        />

මේ code එක දාල බලන්න.button එකක් design වේවි මේ code එකට අදාලව

මුලින්ම බලමු textbox එකේ code ඒක ගැන

<TextBox x:Name="Text1"
                 HorizontalAlignment="Left"
                 Height="45" Margin="48,325,0,0"
                 TextWrapping="Wrap" Text=""
                 VerticalAlignment="Top" Width="300"

                 />

මේකෙදි ඔයාලට පෙනේවි එකම ටැග් ඒක ඇතුලේ code ටික දාල තියෙන බව.start ටැග් එකකුයි end ටැග් එකකුයි දෙකක් පාවිච්චි නොකර.එත් දෙකක් පාවිච්චි කරලත් දාන්න පුළුවන්.මෙන්න මෙහෙම

<TextBox x:Name="Text1"
                 HorizontalAlignment="Left"
                 Height="45" Margin="48,325,0,0"
                 TextWrapping="Wrap" Text=""
                 VerticalAlignment="Top" Width="300"
>

< /TextBox>

start ටැග් එකේදී තමයි මේ component එකට අදාල properties දෙන්න ඕනේ..

 x:Name="Text1" - component එකේ නම
HorizontalAlignment="Left" - තිරස් අතට align වෙන්න ඕනේ කොතෙන්ටද කියන එක
Height="45" - component එකේ උස
Margin="48,325,0,0" - component margin වල අගයන්
TextWrapping="Wrap"
Text="" - component ඒක මත පෙන්නන්න ඕනේ value එක
VerticalAlignment="Top"  - සිරස් අතට align වෙන්න ඕනේ කොතෙන්ටද කියන එක
Width="300" - component එකේ දිග

මම මේ ගත්තේ textbox එකක properties..දැන් බලමු button එකේ

x:Name="but1" - component එකේ නම
HorizontalAlignment="Center" - තිරස් අතට align වෙන්න ඕනේ කොතෙන්ටද කියන එක
Height="60" - component එකේ උස
Margin="0,400,0,0"  - component margin වල අගයන්
Content="OK" - component ඒක මත පෙන්නන්න ඕනේ value එක
VerticalAlignment="Top"  - සිරස් අතට align වෙන්න ඕනේ කොතෙන්ටද කියන එක
Width="100"  - component එකේ දිග

මේ දෙකේ component ඒක මත පෙන්නන්න ඕනේ value එක තියෙන්නේ textbox එකේ text කියන property එක විදිහට.button එකේ content කියල property එකක් විදිහට.අනිත් සේරම සමානයි..සමානයි කියන්නේ ඒවා හැම component එකටම පොදු properties අර වෙනස් උනේ component එකෙන් component එකට ආවේනික උන properties..ඊලග ලිපියෙන් xaml.cs file එක ගැන කතා කරමු

Tuesday, May 19, 2015

ඔයාගේ java prgramme එකට MySQL database එකක් connect කරගන්න...


JDBC Technology කියන්නේ java වල තියෙන API එකක්. මේක Java SE වල වගේම Java EE වලත් තියෙනවා.මේ API එක පාවිච්චි කරන්නේ Database  connection හදාගැනීමටයි.අද මම කියල දෙන්නේ මේ API එකේ JDBC driver classes පාවිච්චි කරලා MySQL database එකකට connection එකක් හදාගන්න class එකක් ලියාගැනීම ,  සහ ජාවා programme එකක් සමග ඒ class එක වැඩකරවීම ගැනයි

මේ වැඩේට අපිට mysql-connector jar file එක ඕනේ වෙනවා..ඒක මෙතනින් ගන්න

මුලින්ම class එක හදාගමු.නිල් පාටින් code එකත් අනිත් පාට වලින් ඒ ඒ line එකෙන් වෙන දේත් දාල තියෙන්නේ

public class JDBC {
    String driver = "com.mysql.jdbc.Driver";  

//connector jar file එකේ Driver classes එක තියෙන path එක driver කියල string එකක් හදල එකට assign කරගන්නවා

    String url = "jdbc:mysql://localhost:3307/test"; 

//database එකට අදාළ path එක url කියල string එකක් හදල එකට assign කරගන්නවා
localhost කියන්නේ  sql server එක දුවන host එක.3307 කියන්නේ port එක.test කියල තියෙන්නේ database එකේ නම


    Connection getConnection() throws Exception { 

// getConnection() කියල method එකක් හදනවා.Connection එකක් return කරන.( return value එක Connection දාල තියෙන්නේ මුලම )

        Class.forName(driver); 

//class කියන class එකේ forname කියන method එකට අර උඩින් හැදුව driver string එක ඒ කියන්නේ Driver class එක තියෙන path එක pass කරනවා.මේ  forname,class කියන ඒවා connector jar file එක ඇතුලේ දැනටමත් හදල තියෙන දේවල්

        Connection con = DriverManager.getConnection(url, "root", "123");

DriverManager කියන class එකේ getConnection කියන method එකට  අර උඩින් හැදුව url string එක,username එක හා password එක දීල තයෙනවා.මේ ටික දුන්නම මේ method එකෙන් Connection එකක් return වෙනවා.ඒක con කියල reference එකකින් අල්ලලා තියෙනවා.

        return con;      //අර අල්ලගත්තු Connection එක  return කරනවා
    }

    public void putData(String sql) {

//putdata කියල public ඒ කියන්නේ ඕනේ තැනක ඉදන් access කරන්න පුළුවන් method එකක් හදා ගන්නවා string parameter එකක් එක්ක.මේකෙන් වැඩගන්න නම්  string එකක් pass කරන්න ඕනේ.එතෙන්ට pass කරන්නේ query එක 

        try {     //try catch එකක් දාගන්නවා

            Statement state = getConnection().createStatement();

//state කියලා statement එකක් හදලා එකෙන් getConnection කියන method එකේ  createStatement කියන method එක පාවිච්චි කරලා හදපු statement object එක අල්ලගන්නවා

            state.executeUpdate(sql);

//ඒ statement object එකේ executeUpdate කියන method එකට sql කියන string එක pass කරලා තියෙනවා.මේ executeUpdate method එකෙන් තමා query එක execute කරන්නේ

        } catch (Exception ex) {
        }

    }

    public ResultSet getData(String sql) throws Exception {

//getdata කියල public ඒ කියන්නේ ඕනේ තැනක ඉදන් access කරන්න පුළුවන් method එකක් හදා ගන්නවා string parameter එකක් එක්ක.මේකෙන් වැඩගන්න නම්  string එකක් pass කරන්න ඕනේ.එතෙන්ට pass කරන්නේ query එක .මේකේ return value එකක් දාල තියෙනවා.resultset එකක්.මේ method ඒක run කරාම query එකට අදාළ results return වෙනවා

        Statement state = getConnection().createStatement();

//state කියලා statement එකක් හදලා එකෙන් getConnection කියන method එකේ  createStatement කියන method එක පාවිච්චි කරලා හදපු statement object එක අල්ලගන්නවා

        ResultSet rset = state.executeQuery(sql);

//ඒ statement object එකේ executeUpdate කියන method එකට sql කියන string එක pass කරලා තියෙනවා.මේ executeUpdate method එකෙන් තමා query එක execute කරන්නේ.මේකෙන් එන results rset කියල හදපු reference එකකින් අල්ලගන්නවා

        return rset;         //rset එකේ value return කරනවා
    }
}

මේ විදිහේ class එකක් හදල database ඒක මෙහෙයවන්න සිංහලෙන් කියනවනම් manipulate කරගන්න ලියපු class එකේ ප්‍රධාන පියවර ටික එන්නේ මෙහෙමයි

මුලින්ම JDBC driver classes අපි ලියන class එකට load කරගෙන සහ ඒවා අපිට අවශ්‍ය database එකට  register කරන් තියෙනවා

String driver = "com.mysql.jdbc.Driver";String url = "jdbc:mysql://localhost:3307/test";

ඊළගට connection object එකක් හදල database server එකට ඇති connection එක අල්ලන් තියෙනවා

Connection getConnection() throws Exception {
        Class.forName(driver);
        Connection con = DriverManager.getConnection(url, "root", "123");
        return con;
    }

ඊළගට Statement objects හදාගෙන තියෙනවා

Statement state = getConnection().createStatement();

ඊළගටStatement objects පාවිච්චි කරලා  database එක manipulate කිරලා තියෙනවා.ඒ කියන්නේ add,delete,update queries run කරලා තියෙනවා

state.executeUpdate(sql);

මේ class එක පාවිච්චි කරලා java programme එකක් ලියන විදිය ගැන පොඩි video එකක් හැදුවා.ඒක පහලින් බලන්න.

Windows mobile apps හදමු - Part 2


අද කියල දෙන්නම් windows mobile app එකක් ලියන විදිය..කලින් ලිපිය බැලුවේ නැති අය මෙතනින් ඒ ලිපිය බලල එන්න

New project එකක් open කරගන්න..දකුණු පැත්තේ solution explorer window එකෙන් MainPage.xaml එක double click කරලා open කරගන්න.එතකොට app එකේ design view එක open වේවි..


windows mobile app එකක Design එක හදන්නේ xaml file එකක් විදියට..දැන් වම් කෙලවරේ තියෙන Toolbox මෙනු එක ගන්න..ඒකෙන් textbox එකක්,textblock එකක් සහ button එකක් අරන් දාගන්න..දාල ලස්සනට design එක හදාගන්න.මම කරන්න යන්නේ textbox එකේ මොකක් හරි ලියල button එක එබුවම ඒ text එක textblock එකේ පෙන්නන්න..මේක ගොඩක් පොඩි දෙයක්..

Textblock එක උඩ click කරලා properties window එකට ගිහින් (දකුණු කෙලවරේ පහල) මෙන්න මේ settings වෙනස් කරගන්න.

Name - Textblock1 (code කරද්දී මේ Textblock එක හදුනාගන්නේ මෙතනට දෙන නමින්)
Text යටතේ size එක 30ක් වගේ දෙන්න.alignment center කරගන්න

අනිත් component දෙකත් Textbox1 , Button1 විදියටත් ඒවගේ text size සහ alignment එකත් හදාගන්න

Button එකේ double click කරලා එකේ text එක ok කියලත් අනිත් දෙකේ text මකලත් දාන්න


දැන් button එක උඩ එකපාරක් click කරලා ආයේ double click කරන්න.එතකොට code කරන්න ඕනේ file එක ඒ කියන්නේ MainPage.xaml.cs file එක open වේවි.එහෙම නැත්තන් solution explorer එකේ MainPage.xaml එක expand කරගන්න(ඉස්සරහ තියෙනේ ඊහිසේ click කරලා).ඒ යටතේ MainPage.xaml.cs file එක ඇති.ඒක open කරගන්න


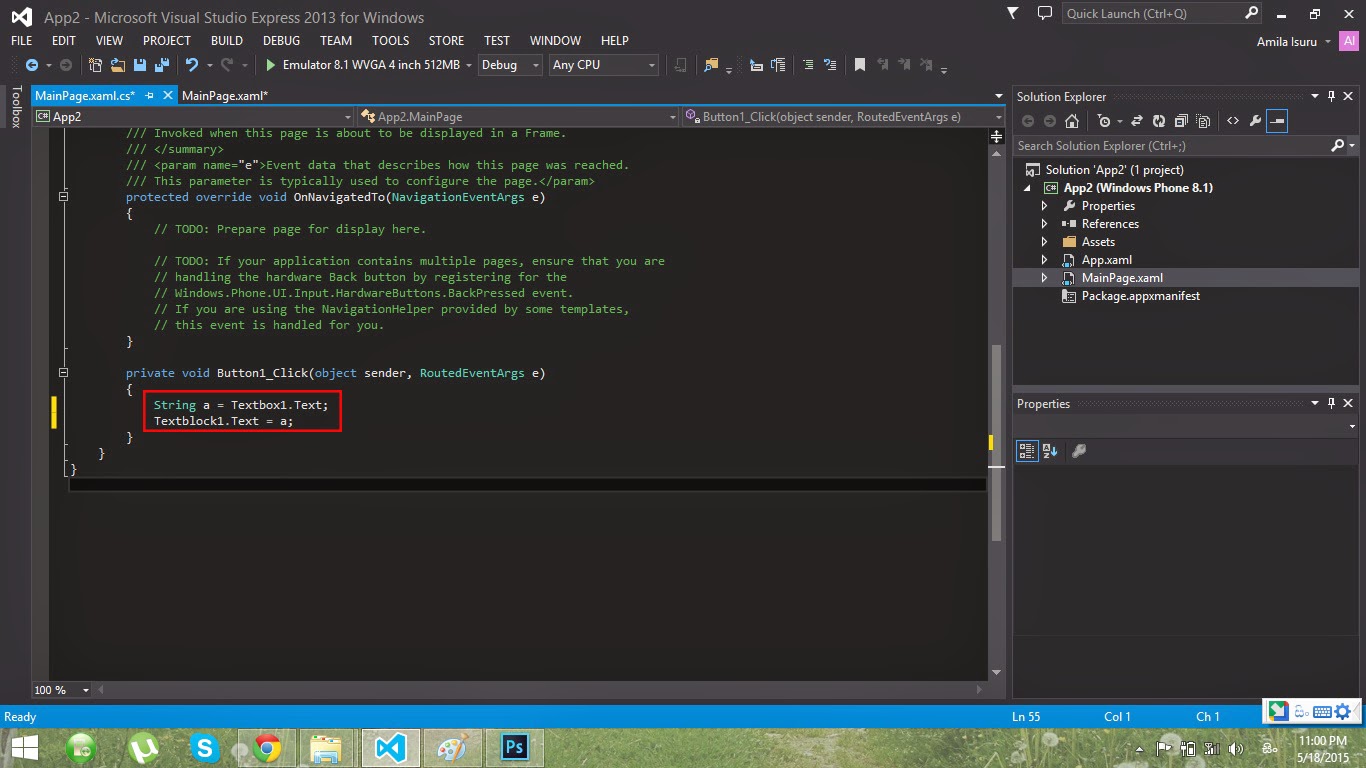
දැන් පහල විදියට code කරන්න

 private void Button1_Click(object sender, RoutedEventArgs e)
        {
              මෙන්න මෙතන code කරන්න ගන්න
        }


            String a = Textbox1.Text;
            Textblock1.Text = a;


පොඩි දෙයක් කරලා තියෙන්නේ..අලුතින් String එකක් හදාගෙන තියෙනවා a කියල.

ඒකට textbox එකෙන් එන value එක පාස් කරලා තියෙනවා

ඊට පස්සේ textblock එකට ඒ value එක සෙට් කරලා තියෙනවා.       

String a = Textbox1.Text;
Textblock1.Text = a;

දැන් app එක run කරලා බලමු.වැඩද කියලා...


මෙන්න මගේ emulator එකේ screenshot එක.තවත් අලුත් දෙයක් එක්ක ඊලග ලිපියෙන් හම්බෙමු...

Friday, May 15, 2015

Windows mobile apps හදමු - Part 1


මේ කාලේ හැමෝම අතර ජනප්‍රිය මාතෘකාවක්නේ mobile apps developing කියන්නේ.ගොඩක් කට්ටිය කියල දෙනවනේ android developing ගැන.මම කියල දෙන්න යන්නේ windows mobile apps developing ගැන.windows mobile apps develop කරන්නේ C# වලින්.ඒ නිසා මුලින්ම කියන්න ඕනේ මේකට C# දැනුම ටිකක් ඕනේ.ඒ නැතත් java හරි වෙනත් programming language එකක් ගැන දන්නා කෙනෙක්ට උනත් කරගන්න අමාරු නැහැ.

windows mobile apps develop කරන්න නම් windows mobile sdk එක ඕනේ.sdk කියන්නේ මොකද්ද කියලනම් දන්නව ඇතිනේ.sdk එකෙන් කරන්නේ windows mobile apps develop කරන්න සහ run කරන්න ඕනේ background එක හදල දෙන ඒක.මේකට   visual studio 2013 දාගන්න  ඕනේ.pro එකක්ම ඕනේ නැහැ.free දෙන express for windows version එක තිබ්බම හොදටම ඇති.මුලින්ම ඒක install කරන ඉන්න.ඊළගට account එකක් හදල ඒක register කරගන්න

දැන් ඒකෙ file - new ගිහාම එන popup window එකේ  visual C# -store apps යටතේ windows phone apps කියන category එකෙන් blank app තෝරලා පහල  name කියන තැනට නමක් දීලා ok කරන්න.


දැන් ඒ app ඒක run කරලා බලන්න.මේ විදියට


run කරද්දී hyper-v ගැන error එකක් එයි,,,එහෙම එන්නේ නැතුව run වෙනවනම් පහල කියන දේවල් කරන්න ඕනේ නැහැ.run වෙන්නේ නැති කට්ටිය ඒ error message එකේම තියෙන turn on hyper v කියන තැන click කරන්න

ඊට පස්සේ එන window එකේ hyper v ඉස්සරහට tick එක දාල ok කරන්න,එතකොට hyper v enable වෙලා restart වෙන්න අහාවි.restart දෙන්න


ඒත් වැඩ කලේ නැත්තන් bios settings වල virtualization technology එක enable කරලා ආයේ  hyper v enable කරන්න..


hyper v enable කරන්න Control Panel -- Programs -- Turn windows features on or off වලිනුත් පුළුවන්.hyper v enable කලාට පස්සේ ඔයාගේ com එකෙත් emulator එක run වේවි.මේක තනිකරම windows phone එකක clone එකක්.මේකේ තමයි අපි ඉස්සරහට ලියන app සේරම run කරන්නේ.දැන් windows mobile apps develop කරන්න සහ run කරන්න ඕනේ background එක හදල ඉවරයි..ඊලග ලිපියෙන් developing පටාන් ගමු....

Friday, March 20, 2015

Database එකත් එක්කම jar file එකක් exe කරන හැටි


Java programming කරන ගොඩක් අයට තියෙන ප්‍රශ්නයක්නේ තමන්ගේ app එකේ database එක ලේසියෙන් වෙන machine එකකට දා ගන්න බැරි එක.mysql දාල config කරලා database backup එක restore කරලා සෑහෙන ගේමක් දෙන්න ඕනනේ..මෙන්න එකට සාර්ථක විසදුමක්..මේ video series එකෙන් database එක පොඩි single file එකක් විදියට හදාගන්න විදිය තියෙනවා.

මෙතනින් බලන්න

Get source code here - http://goo.gl/GEv5St

Get project here - http://goo.gl/vbYmcD

Get JDBC class here - http://goo.gl/4Pti7i

Get easy binder here - http://goo.gl/ZkFqhW